Back in April I was editing photos for this blog post and no matter what I did, I couldn’t get them right.
If you shoot in RAW you know there’s always some editing you want to do in Lightroom to give the photo more brightness and more accurate coloring.
I usually adjust the same settings to various degrees, and it’s good—but this time the coloring was WAY OFF.
I kept playing with it and couldn’t get it right. I was SUPER frustrated. I felt like something had to be off, but couldn’t figure out what it was.
A few years ago, I took a photography class at CSM, and had the most amazing teacher, Barbara, who I’ve kept in touch with, so I texted Barbara, completely stumped, and she completely came through.
P.S. Barbara’s work is AMAZING. Take a look at it here: barbaraboissevain.com
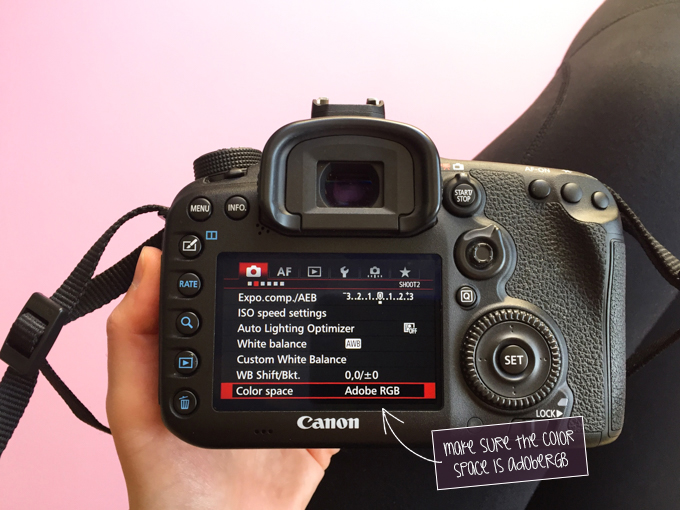
So, she told me to check the color space on my camera to make sure it’s set to AdobeRGB. It wasn’t. Of course. It was set to sRGB when I took those photos. At some point it must have changed to sRGB, & I didn’t realize it—maybe my hand hit it.
That’s why I couldn’t get the coloring right. The photos were captured in a limited color space.
If you’re shooting in RAW, make sure the color space on your camera is set to AdobeRGB.

While I export my photos in sRGB when they’re intended for web, I always capture them in AdobeRGB so I have a larger color space to play with in Lightroom. AdobeRGB gives you a larger color space to play with than sRGB.
Since then, I’ve made it a habit to check my color space before I start using my camera, just to make sure it’s still set to AdobeRGB.
Just a little tip that could save you lot of frustration down the road, THANKS to Barbara ; ) Thanks, Barbara!
LMK if you find this helpful & if you’d like more posts about photography. I love getting feedback from you guys.
Thanks for reading! My eyes (& phone) are telling me it’s way past my bedtime so I’m off to shower & crawl into bed. Sweet dreams!
<3,
Bita

Shop my photography tools:


